This chapter describes in detail the function of each window, menu, and display in the WorkShop Pro MPF Parallel Analyzer View's user interface. It contains the following main sections:
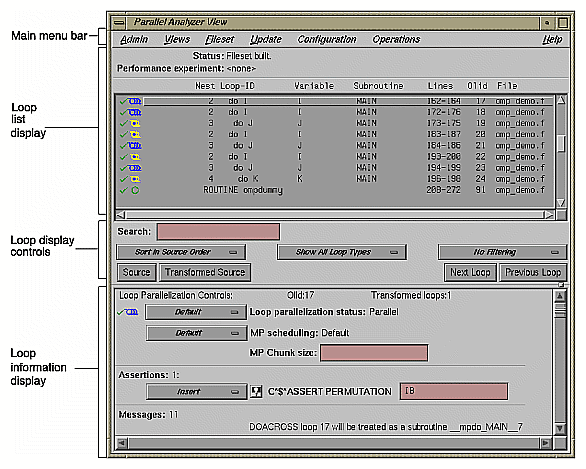
The main window is displayed when the Parallel Analyzer View begins. It consists of the following elements, shown in Figure 4-1:
Main menu bar, containing these menus:
Admin: Discussed in "Admin Menu".
Views: See "Views Menu".
Fileset: See discussion in "Fileset Menu".
Update: See "Update Menu".
Configuration: Find in "Configuration Menu".
Operations: See "Operations Menu".
Help: See discussion in "Help Menu".
Loop list display, which has the following members:
Status information: See "Status and Performance Experiment Lines".
Performance experiment information: Find in "Status and Performance Experiment Lines".
Loop list: See "Loop List".
Loop display controls, consisting of the following:
Search editable text field: See "Search Loop List Field".
Three option buttons displaying default values: Sort in Source Order, Show All Loop Types, and No Filtering. These buttons are described in "Sort Option Button", "Show Loop Types Option Button", and "Filtering Option Button".
Source and Transformed Source control buttons: See "Loop Display Buttons".
Next Loop and Previous Loop loop list navigation buttons: See description in "Loop Display Buttons".
Loop information display: See "Loop Information Display".
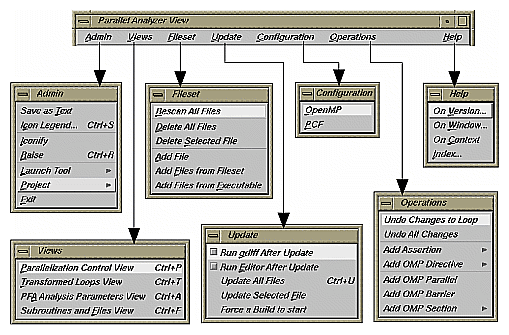
This section describes the menus found in the menu bar located at the top of the Parallel Analyzer View main window as shown in Figure 4-2. The menus are discussed in these sections:
Within each menu, the names of some options are followed by keyboard shortcuts, which you can use instead of the mouse for faster access to these options. For a summary, see "Keyboard Shortcuts".
You can tear off a menu from the menu bar, so that it is displayed in its own window with each menu command visible at all times, by selecting the dashed line at the top of the menu (the first item in each of the menus). Submenus can also be torn off and displayed in their own window.
Figure 4-3 shows the Parallel Analyzer View Admin menu, which contains file-writing commands, other administrative commands, and commands for launching and manipulating other WorkShop application views.
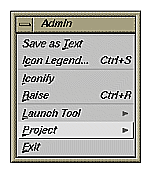
The commands in the Admin menu have the following effects:
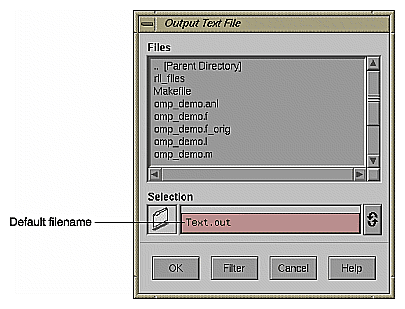
| Save as Text | Saves the complete loop information for all files and subroutines in the current session in a plain ASCII file. Choosing Admin > Save as Text brings up a File Selection dialog, which lets you choose where to save the file and what name to call it. (See Figure 4-4.) The default directory is the one from which you invoked the Parallel Analyzer View; the default filename is Text.out. The Parallel Analyzer View asks for confirmation before overwriting an existing file. | |
| Icon Legend… | Provides an explanation of the graphical icons used in several of the views. Shortcut: Ctrl+S. See "Icon Legend… Option". | |
| Iconify | Stows all the open windows belonging to a given invocation of the Parallel Analyzer View as icons in the style of the window manager you are using. | |
| Raise | Brings all open windows in the current session to the foreground of the screen, in front of other windows. The command also opens any previously iconified windows belonging to the invocation of the Parallel Analyzer View and brings them to the foreground. Shortcut: Ctrl+R. | |
| Launch Tool | Opens various WorkShop tools. See "Launch Tool Submenu". | |
| Project | Controls project windows. See "Project Submenu". | |
| Exit | Quits the current session of the Parallel Analyzer View, closing all windows. If you have not updated source files and have pending requests for changes, a dialog box asks if it is OK to discard the changes. Click OK only if you want to discard any changes; otherwise, click Cancel to update the files. |
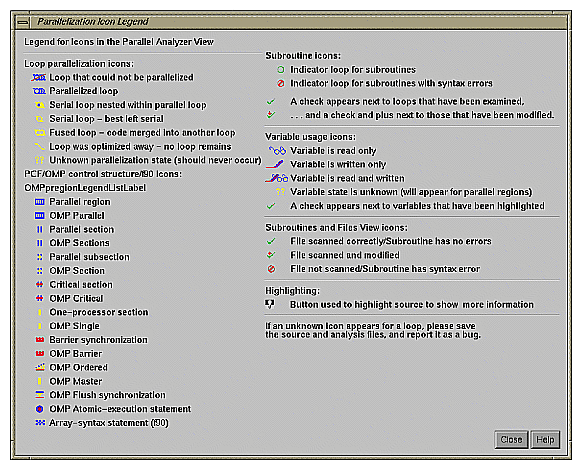
This Admin menu option opens the Parallelization Icon Legend (Figure 4-5) which provides the meanings of the icons that appear in various views, such as the following:
Parallel Analyzer View, shown in Figure 2-1
Transformed Loops View, shown in Figure 4-28
Subroutines and Files View, shown in Figure 4-30
Parallelization Control View, shown in Figure 4-25
The Admin menu's Launch Tool submenu contains commands for launching other WorkShop tools, as well as new sessions of the Parallel Analyzer. (See Figure 4-6.)
To work properly with the other WorkShop tools, the files in the current fileset must have been loaded into the Parallel Analyzer from an executable. There are two ways to do this:
Use the -e option on the command line. (See "Running the Parallel Analyzer View: General Features".)
Choose the Fileset > Add File menu option. (See "Fileset Menu".)
If you launch Workshop tools from a session not based on an executable, the tools start without arguments.
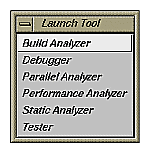
The following six options launch applications from the Launch Tool submenu:
If any of these tools is not installed on your system, the corresponding menu item is grayed out.
If the file /usr/lib/WorkShop/system.launch is absent (that is, if you are running the Parallel Analyzer View without WorkShop 2.0 installed), the entire Launch Tool submenu is grayed out.
The Project submenu of the Admin menu contains commands that affect all the windows containing WorkShop or WorkShop Pro MPF applications that have been launched to manipulate a single executable. The set of windows is a WorkShop project. The Project submenu and windows that you can open from it are shown in Figure 4-7.
The Project submenu commands are as follows:

The Views menu of the Parallel Analyzer View (Figure 4-8) contains commands for launching a variety of secondary windows, or views, that provide specific sets of information about, and tools to apply to, selected loops.
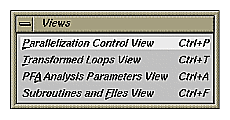
The options in the Views menu have the following effects:
| Parallelization Control View |
| |
| Transformed Loops View |
| |
| PFA Analysis Parameters View |
| |
| Subroutines and Files View |
|
The Fileset menu (Figure 4-9) contains commands for manipulating the files displayed by the Parallel Analyzer View. A fileset is a list of source filenames contained in an ASCII file, each on a separate line.
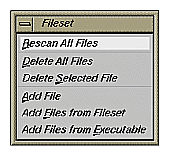
The options in the Fileset menu have the following effects:
| Rescan All Files |
| |
| Delete All Files |
| |
| Delete Selected File |
| |
| Add File | Adds a new source file to the current session of the Parallel Analyzer View. Selecting this command brings up a File Selection dialog that lets you select a Fortran source file. Before you can select a given source file, you must compile it to create the .anl file needed by the Parallel Analyzer View. (See "Compiling a Program for Parallel Analyzer View".) If the current session is based on an executable, you cannot add files to it until you have deleted the executable's fileset. (See the Add Files from Executable option, described below.) | |
| Add Files from Fileset |
If the current session is based on an executable, you cannot add files to it until you have deleted the executable's fileset. | |
| Add Files from Executable |
|
The Parallel Analyzer View Update menu (Figure 4-10) contains commands for placing requested changes to directives and assertions in your Fortran source code.
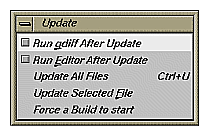
The options in the Update menu have the following effects:
| Run gdiff After Update |
If you always wish to see the gdiff window, you may set the resource in your .Xdefaults file:
For more information on using gdiff, see the man page for gdiff(1). | |||
| Run Editor After Update |
If you always wish to run the editor, you can set the resource in your .Xdefaults file:
If you prefer a different window shell or a different editor, you can modify the resource in your .Xdefaults file and change from xwsh or vi as you prefer. The following is the default command in the .Xdefaults, which you can edit for your preference:
In the above command, the +%d tells vi at what line to position itself in the file and is replaced with 1 by default (you can also omit the +%d parameter if you wish). The edited file's name either replaces any explicit %s, or if the %s is omitted, the filename is appended to the command. | |||
| Update All Files |
| |||
| Update Selected File |
| |||
| Force a Build to start |
|
The Configuration menu (Figure 4-11) allows you to choose between having the Parallel Analyzer View use OpenMP or PCF directives.

The options are the following:
The Parallel Analyzer View Operations menu contains commands for adding assertions and directives to loops, and removing pending changes to source files (Figure 4-12). The general effects of the Operations menu options are to prepare a set of requested changes to your source code. For information on how these changes are subsequently performed see "Update Menu".
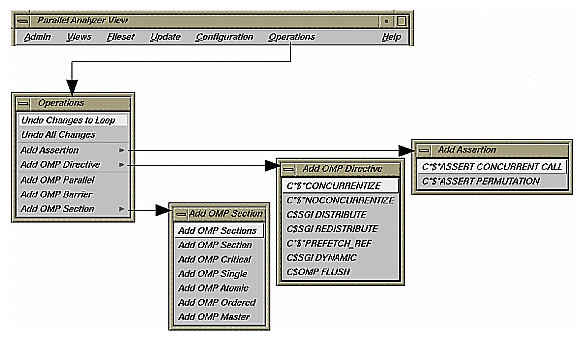
The Operations menu is one of two points in the Parallel Analyzer View where you can add assertions and directives. The other point is discussed in "Loop Parallelization Controls in the Loop Information Display". These two menus focus on different aspects of the parallelization task:
The Operations menu focuses on automatic parallelization directives, which may be inserted in code by the MIPSpro Auto-Parallelizing Option, and memory distribution.
The parallelization controls in the loop information display focus on manual (that is, not automatic) parallelization controls, which you can insert to further parallelize your code.
The assertions and directives you can add from the Operations menu are listed in two tables. Table 4-1 contains a list of directives and assertions for parallelizing code that can be added with the Add Assertion and Add OMP Directive menus. Table 4-2 lists directives that are available from the Add OMP Section menu and are used to synchronize access to sections of code by threads.
Table 4-1. Add Assertion and Add OMP Directive Menu Options
Option | Effect on Compilation | For More Information |
|---|---|---|
Ignore dependences in subroutine calls that would inhibit parallelizing. | MIPSpro Auto-Parallelizing Option Programmer's Guide, Chapter 3 | |
Array array_name is a permutation array. | MIPSpro Auto-Parallelizing Option Programmer's Guide, Chapter 3 | |
Selectively override C*$* NOCONCURRENTIZE. Typically inserted during automatic parallelization. | MIPSpro Auto-Parallelizing Option Programmer's Guide, Chapter 3 | |
Do not parallelize file subroutine (depending on placement). Typically inserted during automatic parallelization. | MIPSpro Auto-Parallelizing Option Programmer's Guide, Chapter 3 | |
Distribute array storage among processors. For Origin2000 systems. | MIPSpro Fortran 77 Programmer's Guide, Chapter 6 | |
Load data into cache. May be used with nonconcurrent code. | MIPSpro Compiling and Performance Tuning Guide, Chapter 4 | |
Allow run-time array redistribution. For Origin2000 systems. | MIPSpro Fortran 77 Programmer's Guide, Chapter 6 | |
Identifies synchronization points at which the implementation is required to provide a consistent view of memory. | OpenMP Fortran Application Program Interface, see http://www.openmp.org |
The options in the Operations menu have the following specific effects:
| Undo Changes to Loop |
| |
| Undo All Changes |
| |
| Add Assertion |
| |
| Add OMP Directive |
| |
| Add OMP Parallel |
| |
| Add OMP Barrier |
| |
| Add OMP Section |
|
To use the Add OMP Section option do the following:
Bring up the Source View.
Using the mouse, sweep out a range of lines for the new construct.
Invoke the appropriate menu item to add the new construct.
When you add a new OMP Section construct, the list is redrawn with the new construct in place, and the new construct is selected. Brackets defining the new constructs are not added to the file loop annotations.
Table 4-2 lists the directives that can be added with the Add OMP Section menu. A more detailed explanation of them can be found in the document OpenMP Fortran Application Program Interface located at Web site of the OpenMP Architecture Review Board, http://www.openmp.org.
Table 4-2. Add OMP Section Menu Options
Option | Meaning |
|---|---|
Specifies that the enclosed sections of code are to be divided among threads in a team. | |
Delineates a section within C$OMP SECTIONS. | |
Restrict access to enclosed code to one thread at a time. | |
Only one thread executes the enclosed code | |
Update memory location atomically, not simultaneously. | |
Execute enclosed code in same order as sequential execution. | |
Specify code to be executed by master thread. |
 | Note: The Parallel Analyzer does not enforce any of the semantic restrictions on how parallel regions and or sections must be constructed. When you add nested regions or constructs, be careful that they are properly nested: they must each begin and end on distinct lines. For example, if you add a parallel region and a nested critical section that end at the same line, the terminating directives are not in the correct order. |
The Help menu contains commands that allow you to access online information and documentation for the Parallel Analyzer View. (See Figure 4-13.)
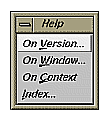
The options in the Help menu have the following effects:
Table 4-3 lists the keyboard shortcuts available in the Parallel Analyzer View:
Table 4-3. Parallel Analyzer View Keyboard Shortcuts
Shortcut | Menu | Menu Option |
|---|---|---|
Ctrl+S | Admin | Icon Legend… |
Ctrl+R | Admin | Raise |
Ctrl+P | Views | Parallelization Control View |
Ctrl+T | Views | Transformed Loops View |
Ctrl+A | Views | PFA Analysis Parameters View |
Ctrl+F | Views | Subroutines and Files View |
Ctrl+U | Update | Update All Files |
This section describes the loop list display and the various option buttons and fields that manipulate the information shown in the loop list display, shown in Figure 4-14.
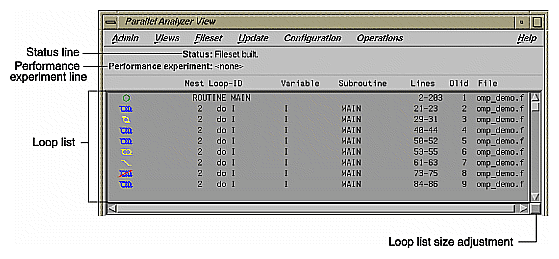
You can resize the loop list to change the number of loops displayed; use the adjustment button: a small square below the Previous Loop button.
The Status line displays messages about the current status of the loop list, providing feedback on manipulations of the current fileset.
The Performance experiment line is meaningful if you run the WorkShop Performance Analyzer. The line displays the name of the current experiment directory and the type of experiment data, as well as total data for the current caliper setting in the Performance Analyzer. (See "Launch Tool Submenu" for information on invoking the Performance Analyzer from the Parallel Analyzer View.) If the Performance Analyzer is not being used, the performance experiment line displays <none>.
The loop list lets you select and manipulate any Fortran DO loop contained in the source files loaded into the Parallel Analyzer View. Information about the loops is displayed in columns in the list; the headings of the columns are shown at the top of Figure 4-15 and described below.
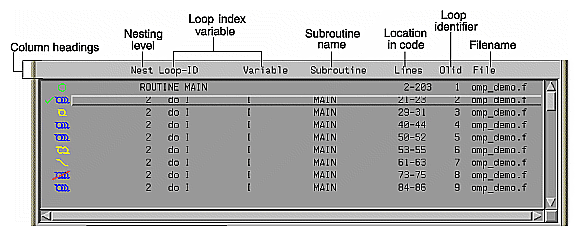
The columns in the loop list contain the following information about each loop, from left to right:
Parallelization icon: Indicates the parallelization status of each loop. The meaning of each icon is described in the Icon Legend dialog box. (See "Icon Legend… Option".) When a loop is displayed in the loop information display (by double-clicking the loop's row), a green check mark is placed to the left of the icon to indicate that it has been examined. If any changes are made from within the loop information display, a red plus sign is placed above the check mark.
Perf. Cost (not shown in Figure 4-15): The performance cost is displayed when the WorkShop Performance Analyzer is launched on the current fileset. (See "Launch Tool Submenu".) The loops can be sorted by Perf. Cost via the sort option button. (See "Sort Option Button".)
When performance cost is shown, each loop's execution time is displayed as a percentage of the total execution time. This percentage includes all nested loops, subroutines, and function calls.
Loop-ID: An ID for each loop in the list display. The ID is displayed indented to the right to reflect the loop's nesting level when the list is sorted in source order, and unindented otherwise.
Subroutine: The name of the Fortran subroutine in which the loop occurs.
Lines: The lines in the source file that make up the body of the loop.
Olid: Original loop id is a unique internal identifier for the loops generated by the compiler. Use this value when reporting bugs.
File: The name of the Fortran source file that contains the loop.
To highlight a loop in the list, click the left mouse anywhere in a loop's row; typing unique text from the row into the Search field does the same thing. (See "Search Loop List Field".)
To select a loop, double-click on its row; this will bring up detailed information in the loop information display below the loop list display. (See "Loop Information Display".) Selecting a loop affects other displays. (See "Selecting a Loop for Analysis".)
The loop display controls are shown in Figure 4-16, and are discussed in the next sections.
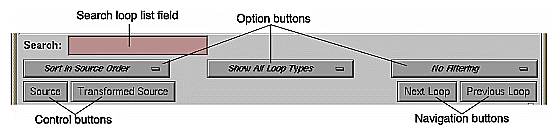
You can use the search loop list editable text field, shown at the top left of Figure 4-16, to find a specific loop in the loop list display. The Parallel Analyzer View matches any text typed into the field to the first instance of that text in the loop list, and highlights the row of the list in which the text occurs. The search field matches its text against the contents of each column in the loop list.
As you type into the field, the list highlights the first entry that matches what you have already typed, scrolling the list if necessary. If you press Enter, the highlight moves to the next match. If no match is found, the system beeps, and pressing Enter positions the highlight at the top of the list again.
The sort option button is the left-most option button under the loop list search field shown in Figure 4-16. It controls the order in which the loops are displayed in the loop list display.
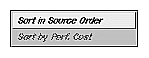
The choices in the sort option button (Figure 4-17) have the following effects:
| Sort in Source Order |
| |
| Sort by Perf. Cost |
|
The show loop types option button is the center option button under the loop list search field shown in Figure 4-16. It controls what kind of loops are displayed for each file and subroutine in the loop list.
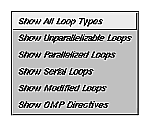
The options in the show loop types button (Figure 4-18) have the following effects:
The filtering option button is the right-most option button under the loop list search field shown in Figure 4-16. It lets you display only those loops contained within a given subroutine or source file.
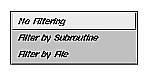
The button choices have the following effects:
To place the name of a subroutine or file in the appropriate filter text field, you can double-click on a line in the Subroutines and Files View. If the appropriate type of filtering is currently selected, the loop list is rescanned.
The loop display controls (Figure 4-16) include two control buttons:
Source: Opens the Source View window, with the source file containing the loop currently selected (double-clicked) in the loop list. The body of the loop is highlighted within the window. If no loop is selected, the last selected file is loaded; if no file is selected, the first file in the fileset is loaded.
For more information on the Source View window, see "Source View and Parallel Analyzer View - Transformed Source".
Transformed Source: Opens a Parallel Analyzer View - Transformed Source window, with the compiled source file containing the loop currently selected (double-clicked) in the loop list. The body of the loop is highlighted within the window. If no loop is selected, the last selected file is loaded; if no file is selected, the first file in the fileset is loaded.
For more information on the Transformed Source window, see "Source View and Parallel Analyzer View - Transformed Source".
The loop display controls also include two navigation buttons:
Next Loop: Selects the next loop in the loop list. The information in the loop information display and all other windows is updated accordingly. If no loop is currently selected, clicking on the button selects the first loop.
Previous Loop: Selects the previous loop in the loop list. The information in the loop information display and all other windows is updated accordingly. If no loop is currently selected, clicking on the button selects the first loop.
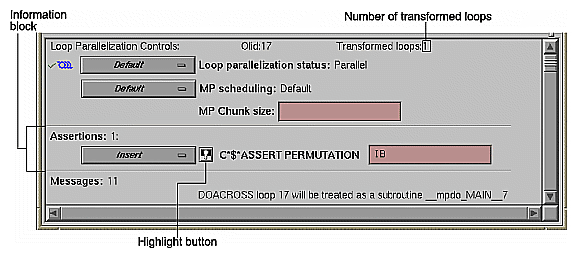
The loop information display provides detailed information on various loop parameters, and allows you to alter those parameters to incorporate the changes into the Fortran source. The display is divided into several information blocks displayed in a scrolling list as shown in Figure 4-20.
Each of these sections and the information it contains is described in detail below. The display is empty when no loop has been selected.
A highlight button (light bulb, see Figure 4-20) appears as a shortcut to more information related to text in the display. Clicking the button does one or both of the following:
Highlights the loop and the relevant line(s) in a Source View window. (See "Source View and Parallel Analyzer View - Transformed Source".)
If a directive appears in the options menu next to it, the highlight button presents details about directive clauses in a Parallelization Control View. (See "Parallelization Control View".)
If directives or assertions with highlight buttons are also listed below the Loop Parallelization Controls, these buttons highlight the same piece of code as the corresponding button in the Loop Parallelization Controls, but they do not activate the Loop Parallelization Control View.
The first line of the Loop Parallelization Controls section shows the Olid of the selected loop and, on the far right, how many transformed loops were derived from the selected loop.
Controls for altering the parallelization of the selected loop are shown in Figure 4-21. The controls in this section allow you to place parallelization assertions and directives in your code. Recall that you have similar controls available through the Operations menu. (See "Operations Menu".)
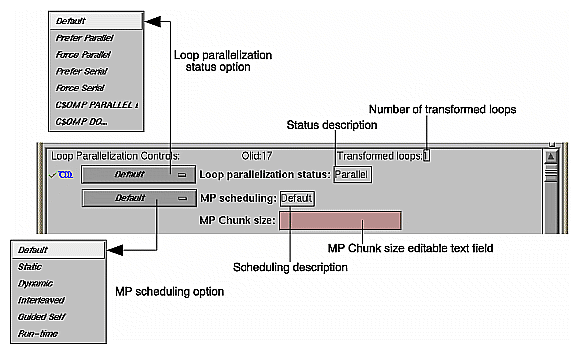
The loop parallelization status option button (shown in Figure 4-21) lets you alter a loop's parallelization scheme. To the right of the option button is the Loop parallelization status field, a description of the current loop status as implemented in the transformed source. A small highlight button appears to the left of this description if the status was set by a directive.
The loop parallelization status option button choices follow below. The directives and assertions mentioned in the choices are described in Table 4-4.
| Default | Always selects the parallelization scheme that the compiler picked for the selected loop. | |
| Prefer Parallel | Adds the assertion C*$*ASSERT DO PREFER (CONCURRENT). | |
| Force Parallel | Adds the assertion C*$*ASSERT DO (CONCURRENT). | |
| Prefer Serial | Adds the assertion C*$ASSERT DO PREFER (SERIAL). | |
| Force Serial | Adds the assertion C*$*ASSERT DO (SERIAL). | |
| C$OMP PARALLEL DO… |
| |
| C$OMP DO… | Launches the Parallelization Control View, which allows you to manipulate the scheduling clauses for the OpenMP C$OMP DO directive and to set each of the referenced variables as either region-default or last-local. A C$OMP DO must be within a parallel region, although the tool does not enforce this restriction. If one is added outside of a region, the compiler reports an error. |
A menu choice is grayed out if you are looking at a read-only file, if you invoked cvpav with the -ro True option, or if the loop comes from an included file. So in some cases you are not allowed to change the menu setting.
Table 4-4 lists the assertions and directives that you control from the loop parallelization status option button.
Table 4-4. Assertions and Directives Accessed From the Loop Parallelization Controls
Assertion or Directive | Effect on Compilation | For More Information |
|---|---|---|
Parallelize the loop; ignore possible data dependences. | MIPSpro Auto-Parallelizing Option Programmer's Guide, Chapter 3 | |
Attempt to parallelize the selected loop. If not possible, try each nested loop. | MIPSpro Auto-Parallelizing Option Programmer's Guide, Chapter 3 | |
Do not parallelize the loop. | MIPSpro Auto-Parallelizing Option Programmer's Guide, Chapter 3 | |
Do not parallelize the loop. | MIPSpro Auto-Parallelizing Option Programmer's Guide, Chapter 3 | |
Parallelize the loop, ignore automatic parallelizer. | OpenMP Fortran Application Program Interface, see http://www.openmp.org | |
Assign each loop iteration to a different thread, ignore automatic parallelizer. | OpenMP Fortran Application Program Interface, see http://www.openmp.org |
The MP scheduling option button (Figure 4-21) lets you alter a loop's scheduling scheme by changing C$MP_SCHEDTYPE modes and values for C$CHUNK. For those modes that require a chunk size, there is a editable text field to enter the value. (See "MP Chunk Size Field".)
These directives affect the current loop and all subsequent loops in a source file. For more information, see Chapter 5 in the MIPSpro Fortran 77 Programmer's Guide. For control over a single loop, use the C$OMP PARALLEL DO directive clause. (See "MP Scheduling Option Button: Clauses for One Loop".)
The button choices are as follows:
To the right of the MP scheduling option button is the MP scheduling field, a description of the current loop scheduling scheme as implemented in the transformed source. A highlight button appears to the left of this description if the scheduling scheme was set by a directive.
Below the MP scheduling description is the MP Chunk size editable text field, a field that allows you to set the C$CHUNK size for the scheduling scheme you select.
When you change an entry in the field, the upper right corner of the field turns down, indicating the change (Figure 4-22). To toggle back to the original value, left-click the turned-down corner (changed-entry indicator). The corner unfolds, leaving a fold mark. If you click again on the fold mark, you can toggle back to the changed value. You can enter a new value at any time; the field remembers the original value, which is always displayed after you click on the changed-entry indicator.

Be aware of the following when you use the MP Chunk size field:
Your entry should be syntactically correct, although it is not checked.
Like any other editable text field, the background color changes when you cannot make edits. This can happen if you are looking at a read-only file, if you invoked cvpav with the -ro True option, if the loop comes from an included file, or in some other cases.
Obstacles to parallelization are listed when the compiler discovers aspects of a loop's structure that make it impossible to parallelize. They appear in the loop information display below the parallelization controls.
Figure 4-23 illustrates a message describing an obstacle. The message has a highlight button directly to its left to indicate the troublesome line(s) in the Source View window, and opens the window if necessary. If appropriate, the referenced variable or function call is highlighted in a contrasting color.

The loop information display lists any assertions and directives for the selected loop along with highlight buttons. When you left-click the highlight button to the left of an assertion or directive, the Source View window shows the selected loop with the assertion or directive highlighted in the code.
Recall that assertions and directives are special Fortran source comments that tell the compiler how to transform Fortran code for multiprocessing. Directives enable, disable, or modify features of the compiler when it processes the source. Assertions provide the compiler with additional information about the source code that can sometimes improve optimization.
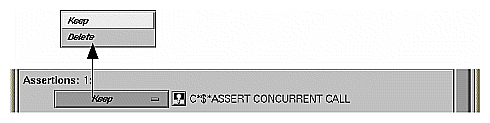
Some assertions or directives appear with an information block option button that allows you to Keep or Delete it. (If you compile o32, you can also Reverse it.) Figure 4-24 shows an assertion block and its option button.
Assertions and directives that govern loop parallelization or scheduling do not have associated option buttons; those functions are controlled by the loop parallelization status option button and the MP scheduling option button. (See "Loop Parallelization Controls in the Loop Information Display".)
The Loop information display also shows any messages generated by the compiler to describe aspects of the loops created by transforming original source loops. As an example, the loop information display in Figure 4-20 shows there are 11 messages present although only one is shown. Some messages have associated buttons that highlight sections of the selected loop in the Source View window.
The views in this section are launched from the Views menu in the main menu bar of the Parallel Analyzer View. All of the views discussed in this section contain the following in their menu bars:
Admin menu: This menu contains a single Close command that closes the corresponding view.
Help menu: This menu provides access to the online help system. (See "Help Menu" for an explanation of the commands in this menu.)
The Parallelization Control View shows parallelization controls (directives and their clauses), where applicable, and all the variables referenced in the selected loop, OpenMP construct, or subroutine. It can be opened by either of two ways.
Selecting the Views > Parallelization Control View option. Figure 4-25 shows the Parallelization Control View when it is launched from the Views menu with the Default loop parallelization status option button; this is the display for loops without directives.
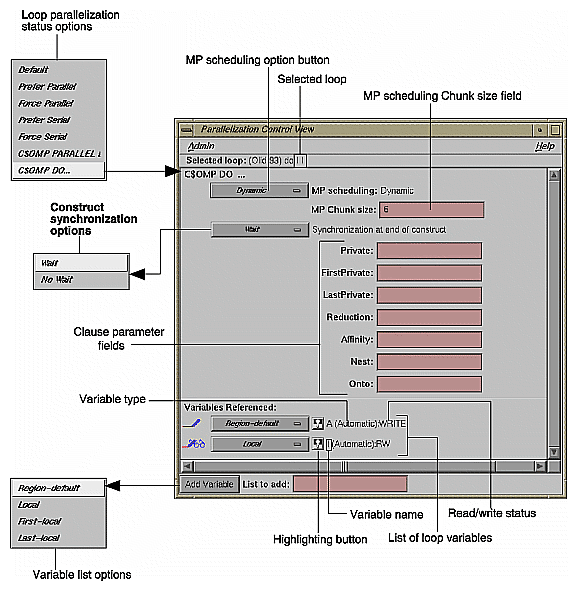
Selecting C$OMP PARALLEL DO… or C$OMP DO… in the loop parallelization status option button (Figure 4-26 and Figure 4-27). This approach provides controls for clauses you can append to these directives.
Features that appear no matter which method is used to open the Parallelization Control View are discussed under "Common Features of the Parallelization Control View". Features that appear only when the view is opened from the loop parallelization status option button with C$OMP PARALLEL DO… or C$OMP DO… selected are discussed in the following:
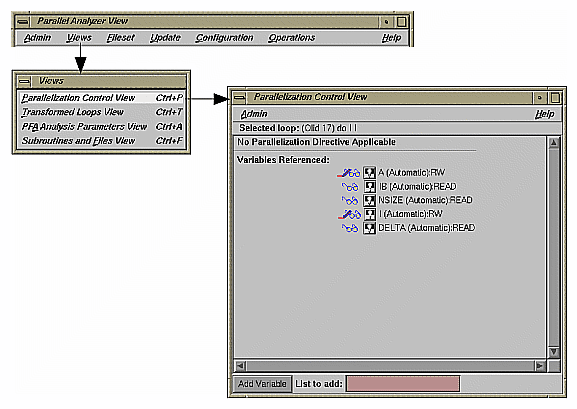
Independently of how you open the Parallelization Control View, these elements appear in the window (Figure 4-25):
Selected loop: Contains the Olid of the loop, and the information about the loop from the Loop-ID and Variable columns of the loop list.
Directive information section: If a directive is applicable to the loop, this section lists directive, clauses, and parameter values. (See "C$OMP PARALLEL DO and C$OMP DO Directive Information".)
Variables Referenced: The listing has two icons for each variable. They allow you to highlight the variable in the Source View and to determine the variable's read/write status; see "Icon Legend… Option" for an explanation of these icons.
For discussion of added option buttons that appear if the view is opened from the loop parallelization status option button when C$OMP PARALLEL DO… or C$OMP DO… is selected, see "Variable List Option Buttons".
Add Variable: Located at the bottom of the window frame, this button allows you to add new variables to a loop.
List to add: Located at the bottom of the window frame, this editable text field allows you to indicate the variables you wish to add to the loop. You may enter multiple variables, with each variable name separated by a space or comma.
Option buttons and editable text fields in addition to those described in "Common Features of the Parallelization Control View" are available if you open the Parallelization Control View from the loop parallelization status option button with either C$OMP PARALLEL DO… or C$OMP DO… selected. (See Figure 4-26 and Figure 4-27.)
There are two additional option buttons available:
MP scheduling option button: This button allows you to alter a loop's scheduling scheme by changing the C$MP_SCHEDTYPE clause. See "MP Scheduling Option Button: Clauses for One Loop" for further information. This is the same button shown in Figure 4-21.
Synchronization construct option button (C$OMP DO… only): This button allows you to set the NOWAIT clause at the end of the C$OMP END DO directive to avoid the implied BARRIER.
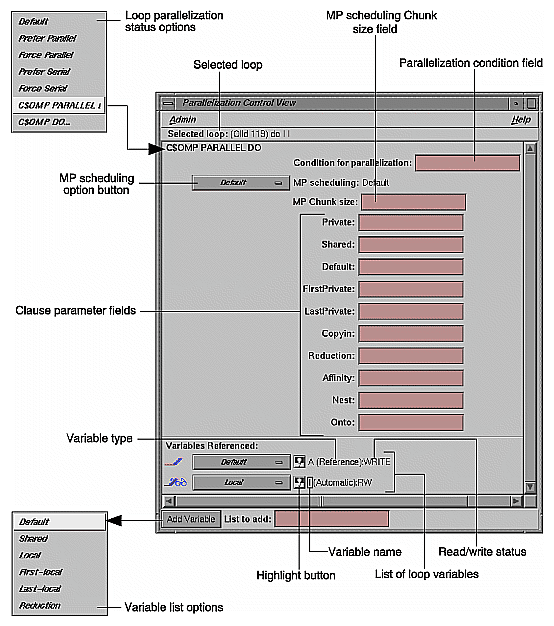
The following is a list of additional editable text fields that allow you to specify clauses for the C$OMP PARALLEL DO or C$OMP DO directives. Unless otherwise specified, the clause descriptions come from the OpenMP Fortran Application Program Interface, Version 1.0 - Oct 1997 on the OpenMP Web site, http://www.openmp.org.
Condition for parallelization: Allows you to enter a Fortran conditional statement, for example, NSIZE .GT. 83. (C$OMP PARALLEL DO… only.)
This statement determines the circumstances under which the loop will be parallelized. The upper right corner of the field changes when you type in the field. Your entry must be syntactically correct; it is not checked.
MP Chunk size: Allows you to set the C$CHUNK size for the scheduling scheme you select. For further information, see "MP Chunk Size Field".
Private: Declares the variables in a list to be PRIVATE to each thread in a team.
Shared: Makes variables that appear in a list shared among all the threads in a team. All threads within a team access the same storage area for SHARED data. (C$OMP PARALLEL DO… only.)
Default: Allows you to specify a PRIVATE, SHARED, or NONE scope attribute for all variables in the lexical extent of any parallel region. Variables in THREADPRIVATE common blocks are not affected by this clause. (C$OMP PARALLEL DO… only.)
Firstprivate: Provides a superset of the functionality provided by the PRIVATE clause.
Lastprivate: Provides a superset of the functionality provided by the PRIVATE clause.
Copyin: Applies only to common blocks that are declared as THREADPRIVATE. (C$OMP PARALLEL DO… only.)
A COPYIN clause on a parallel region specifies that the data in the master thread of the team be copied to the thread private copies of the common block at the beginning of the parallel region.
Reduction: Performs a reduction on the variables that appear in a list with an operator (+, *, -, .AND., .OR., .EQV., or .NEQV.), or an intrinsic (MAX, MIN, IAND, IOR, or IEOR).
Affinity: Allows you to specify the parameters for the affinity scheduling clause. The two types of affinity scheduling are described below. (For more details and syntax, see the MIPSpro Fortran 77 Programmer's Guide.)
Data affinity scheduling, which assigns loop iterations to processors according to data distribution.
Thread affinity scheduling, which assigns loop iterations to designated processors.
Nest: Allows you to specify parameters in this clause for concurrent execution of nested loops. You can use the NEST clause to parallelize nested loops only when there is no code between either the opening DO statements or the closing ENDDO statements. For more details and syntax, see the MIPSpro Fortran 77 Programmer's Guide.
Onto: Allows you to specify parameters for this clause to determine explicitly how processors are assigned to array variables or loop iteration variables. For more details and syntax, see the MIPSpro Fortran 77 Programmer's Guide.
The Parallelization Control View contains an MP scheduling option button if it is opened from the loop parallelization status option button with either C$OMP PARALLEL DO… or C$OMP DO… selected.
The options that appear have the same names as those for the MP scheduling option button in the loop information display, shown in Figure 4-21. However, the option button in the Parallelization Control View affects the C$MP_SCHEDTYPE and C$CHUNK clauses in the C$OMP PARALLEL DO directive, and so affects only the currently selected loop. Recall that the MP scheduling option button in the loop information display affects the placement of the C$MP_SCHEDTYPE and C$CHUNK directives and thus all subsequent loops.
Except for this difference in scope, the effects of both option buttons are the same; for a description, see "MP Scheduling Option Button: Directives for All Loops". For more information, see the MIPSpro Fortran 77 Programmer's Guide.
If the Parallelization Control View is opened from the loop parallelization status option button when either C$OMP PARALLEL DO… or C$OMP DO… is selected, each variable listed in the lower portion of the view appears with an option button. The menu allows you to append a clause to the directive, enabling you to control how the processors manage the variable. It is an addition to the highlight and read/write icons discussed in "Common Features of the Parallelization Control View".
| Note: The highlight button may not indicate in the Source View all the occurrences relevant to a variable subject to a OpenMP directive; you may need to select the entire parallel region in which the variable occurs. |
If the view is opened from the loop parallelization status option button when C$OMP PARALLEL DO… is selected, these are the variable list option button choices (Figure 4-26):
If the view is opened from the loop parallelization status option button when C$OMP DO… is selected, these are the variable list option button choices (Figure 4-27):
In parentheses after each variable name in the list of variables is a word indicating the storage class of the variable. There are three possibilities:
The Transformed Loops View contains information about how a loop selected from the loop list is rewritten by the compiler into one or more transformed loops.
To open this view, choose Views > Transformed Loops View. (See Figure 4-28)
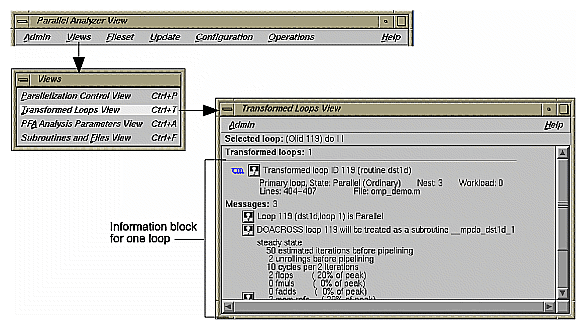
Loop identifying information appears on the first line below the window menu, and below that is an indication of how many transformed loops were created.
Each transformed loop is displayed in its own section of the Transformed Loops View in an information block.
The first line in each block for contains:
A parallelization status icon
A highlighting button (highlights the loop in the Transformed Source window and in the original loop in the Source View)
The Olid number of the transformed loop
The next line describes the transformed loop, providing information such as the following:
Whether it is a primary loop or secondary loop (whether it is directly transformed from the selected original loop or transformed from a different original loop, but incorporates some code from the selected original loop)
Parallelization state
Whether it is an ordinary loop or interchanged loop
Its nesting level
The last line in the loop's information block displays the location of the loop in the transformed source.
Any messages generated by the compiler are below the loop information blocks. To the left of the message lines are highlight buttons. Left-clicking them highlights in the Transformed View the part of the original source that relates to the message. Often it is the first line of the original loop that is highlighted, since the message refers to the entire loop.
If you compile with o32, you can use the PFA Analysis Parameters View, which contains a list of PFA execution parameters accompanied by fields into which you can enter new values. If you compile with n32 or n64, these parameters have no effect and this view is not useful.
To open this view, choose Views > PFA Analysis Parameters View in the main window. (See Figure 4-28.)
When you update a source file, any PFA parameters you alter are changed for that file (Figure 4-29). When you change a parameter, the upper right corner of the field window turns down, as discussed in "MP Chunk Size Field".
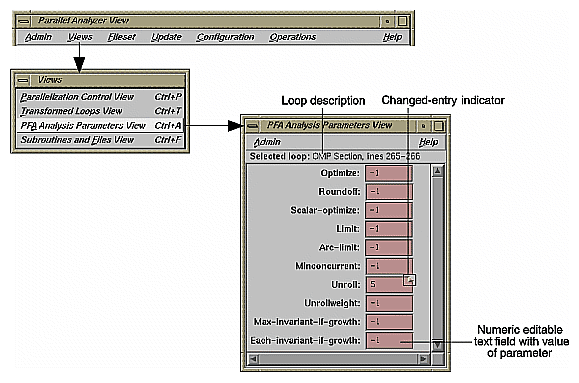
A full explanation of the PFA parameters, shown in Figure 4-29, can be found in Chapter 4, "Customizing PFA Execution," in the POWER Fortran Accelerator User's Guide.
The Subroutines and Files View contains a list from the file(s) in the current session of the Parallel Analyzer View (Figure 4-30). Below each filename in the list is an indented list of the Fortran subroutines it contains. Each item in the list is accompanied by icons to indicate file or subroutine status:
A green check mark appears to the left of the file or subroutine name if the file has been scanned correctly or the subroutine has no errors.
A red plus sign is above the green check mark shows if any changes have been made to loops in the file using the Parallel Analyzer View.
A red international not symbol replaces the check mark if an error occurred because a file could not be scanned or a subroutine had errors.
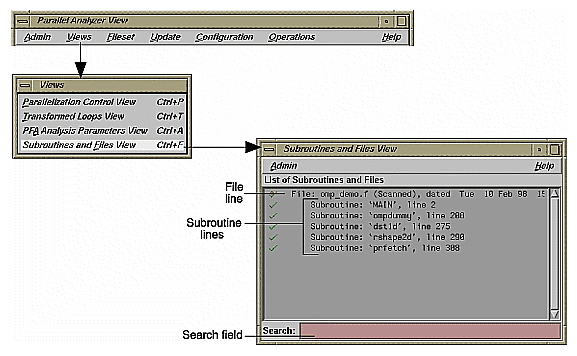
The Search field in the Parallel Analyzer View uses the subroutine and file names listed in the Subroutines and Files View as a menu for search targets; see "Search Loop List Field".
You can select items in the list for two purposes:
To save changes to a selected file: click the filename and use the Update > Update Selected File option at the top of the Parallel Analyzer View main window. (See "Update Menu".)
To select a file or subroutine for loop list filtering, discussed in "Filtering Option Button", double-click on it. The selected name appears in the filtering text field; if the item is appropriate for the selected filtering option, the loop list is rescanned.
At the bottom of the window is a Search editable text field, which you can use to search the list of files and subroutines.
These views are summoned by clicking on the Source and Transformed Source loop display control buttons.
The Source View window and the Transformed Source window together present views of the source code before and after compiler optimization (Figure 4-31). The two windows use the WorkShop Source View interface.
Both the Source View and Transformed Source windows contain bracket annotations in the left margin that mark the location and nesting level of each loop in the source file. Clicking on a loop bracket to the left of the code chooses and highlights the corresponding loop.
In the Transformed Source window, an indicator bar (a vertical line in a different color) indicates each loop that was transformed from the selected original loop.
If the source windows are invoked from a session linked to the WorkShop Performance Analyzer (see "Launch Tool Submenu"), any displayed sources files known to the Performance Analyzer are annotated with performance data.

| Note: The File and Display menus shown in the Source View and Transformed Source windows are standard Source View menus, and are described in the Developer Magic: Debugger User's Guide. |